Best Practices for Using Real-Time Van Trackers
Set goals, protect driver privacy, assign alert owners, match tracker settings and review KPIs to cut fuel, delays and theft.
If I want van tracking to pay off, I need to do four things well: set rules first, match settings to each van, train people by role, and review the numbers every month.
In simple terms, live tracking helps me send the right van faster, cut fuel waste, protect vans and tools, and keep tighter control of day-to-day work. The article makes one point clear: a tracker on its own does nothing. I only get results when I link it to clear KPIs, named alert owners, driver privacy rules, and regular reviews.
Here’s the whole article in one quick view:
- Set goals before rollout: track things like fuel spend per mile, idle time, late arrivals, and theft history.
- Write a driver policy: explain what data is collected, why, who can see it, and how long it stays on file under UK GDPR.
- Give each alert an owner: for example, supervisors handle geofence or out-of-hours movement alerts, while a security contact deals with theft signals.
- Set each van up by job type: city multi-drop vans may need updates every 10–30 seconds; long-distance vans may only need 2–5 minutes.
- Use geofences and idle alerts with care: a 2-minute dwell filter and 3–5 minute idle alert can cut false alarms.
- Pick hardware by risk: hardwired units suit daily fleet use; battery-backed or dual units suit vans with tools, stock, or higher theft risk.
- Roll out in stages: start with the top 20–30% of vans by risk or workload for 4–6 weeks.
- Train by role: dispatchers use live maps and ETAs, supervisors check trends, and drivers need clear privacy and policy briefings.
- Use the data every day: nearest-van dispatch, route replay, idling checks, and theft response should become normal habits.
- Review results monthly: compare fuel, miles, idle time, on-time rate, detours, and security events against the baseline.
A short side note from the article: install time matters too. A hardwired tracker often takes about 30–45 minutes to fit, followed by a 10–15 minute road test.
If I had to boil the piece down to one line, it would be this: keep the setup simple, lawful, and tied to action.
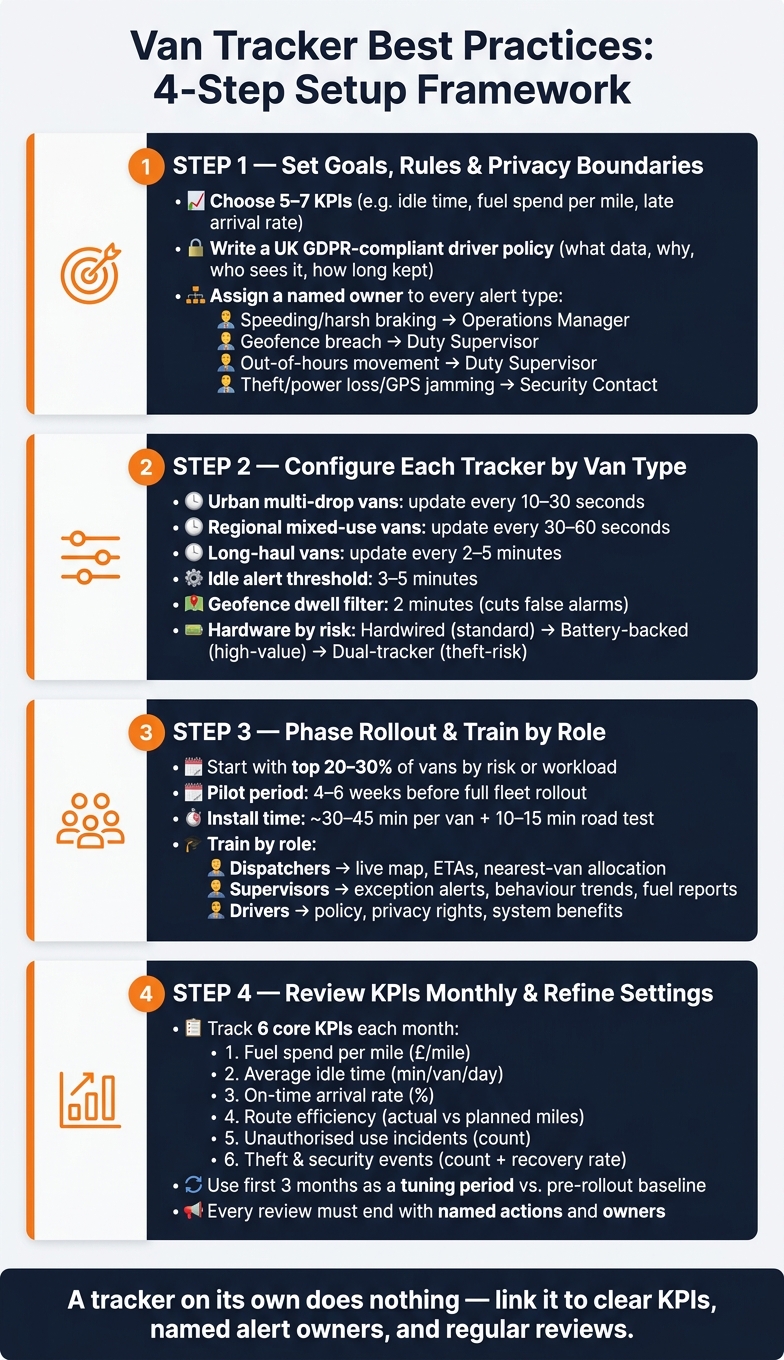
Van Tracker Best Practices: 4-Step Setup Framework
1. Set clear goals, rules and privacy boundaries before rollout
Set the rules before the first tracker goes live. Companies tend to get better results when they decide, up front, what the system needs to do, who can use the data, and when access is allowed.
Choose a small set of measurable outcomes
Start with the baseline figures you’ve already recorded. Then pick five to seven KPIs that show whether tracking is making a difference. Good examples include average idle time per van per day, late arrival rate as a percentage of scheduled jobs, fuel spend per vehicle per month in £, and the number of out-of-hours vehicle movements.
Be specific with targets. For example, you might aim to cut average idle time by 20% within three months. That gives the team something clear to work towards, instead of relying on vague hopes that the system will “help operations”.
Write a driver policy for business use and off-duty privacy
In the UK, location data linked to an identifiable driver counts as personal data under the UK GDPR and the Data Protection Act 2018. That means you need a lawful basis for collecting it.
Your driver policy should spell out:
- what data is collected
- why it is collected
- who can see it
- how long it is kept
If vans are taken home or used outside core hours, deal with off-duty privacy head-on. If your system has a privacy mode that records mileage but hides precise location during personal-use periods, switch it on and tell drivers when it applies. If it doesn’t, state in writing that out-of-hours checks will be limited to genuine security cases, such as a theft alert.
The ICO says drivers must know what is collected, why it is collected, who controls it, and how they can exercise their rights.
Brief drivers before go-live and get written acknowledgement that they have read the policy. Clear privacy rules often make staff more willing to accept the system and use it as intended. Once those rules are in place, the next step is simple: every alert needs an owner.
Decide who acts on alerts and exceptions
After the policy is set, decide who responds when the system sends an alert. An alert with no owner usually ends up ignored.
Before rollout, match each alert type to a named role and a written response. Dispatchers will often handle routing and ETA alerts during the working day. Operations managers are usually the right people to review driver behaviour data, such as speeding or harsh braking, and record it for coaching talks. Out-of-hours movement and geofence breaches should go to a duty supervisor, who can check whether the activity is allowed and escalate if it isn’t.
For theft-related alerts, keep a separate written response procedure. If a van shows unexpected movement, power loss or GPS jamming, the named security contact should call the driver at once, confirm the van’s live position, and report to the police with real-time location data if theft is confirmed.
| Alert type | Recommended owner | Expected action |
|---|---|---|
| Speeding or harsh braking | Operations manager | Log incident; discuss with driver at next review |
| Geofence breach | Duty supervisor | Verify if authorised; escalate if not |
| Out-of-hours movement | Duty supervisor | Contact driver; investigate if unexplained |
| Theft, power loss or GPS jamming | Named security contact | Contact driver, verify location, report to police |
sbb-itb-499a7f0
2. Configure the tracker to match how each van is used
Once alert ownership is sorted, set up each tracker around the way that van actually works. One profile for every vehicle sounds tidy, but it usually creates two problems at once: too many alerts on low-use vans, and not enough detail on busy ones.
The aim is simple. Use those rules to decide:
- how often each van should report
- which alerts matter
- what hardware each unit needs
Match update frequency to how busy the route is
The right update interval comes down to one thing: how often the van's location changes a decision.
For urban multi-drop work - say, a parcel delivery van making 20–40 stops a day in a city - updates every 10–30 seconds help with rerouting, ETAs and missed-stop checks. In that kind of job, a van can be one street away and still be late.
For regional mixed-use vans with only a few planned stops, a 1–5 minute interval is often enough. The vehicle's position doesn't shift in a way the office needs to act on every few seconds, so there's no point flooding the platform with extra pings.
A simple way to handle this is to create three update profiles and assign each van to one:
- Urban multi-drop: 10–30 seconds
- Regional mixed-use: 30–60 seconds
- Long-haul: 2–5 minutes
Many platforms also allow motion-based intervals. That means faster updates when the van is moving and slower ones when it's parked. It's a sensible middle ground: you cut data use without losing sight of the vehicle when timing matters.
Tie those intervals back to the KPIs from section 1. That keeps update frequency tied to results, not just set as a bit of back-office admin.
Set geofences, idle alerts and speed, braking and idling thresholds
Geofences work best when they match real operating points, not random circles on a map. Good starting points are your depot, key customer sites and overnight parking spots.
It also helps to add a short dwell-time filter. For example, trigger an alert only if the van stays inside or outside a boundary for more than two minutes. That small delay cuts false positives from drive-bys, traffic hold-ups or a brief wrong turn.
Set idle alerts at 3–5 minutes. That's usually enough to spot waste without flagging normal delivery stops or short pauses.
For speed and braking thresholds, start with the cautious default settings your telematics provider suggests. Then review the first month's data before changing anything. If you tighten thresholds too early, you'll often end up with noise instead of something useful.
Use speeding and harsh-braking alerts as coaching data, backed by monthly scorecards. That tends to land better than treating every alert like a disciplinary issue.
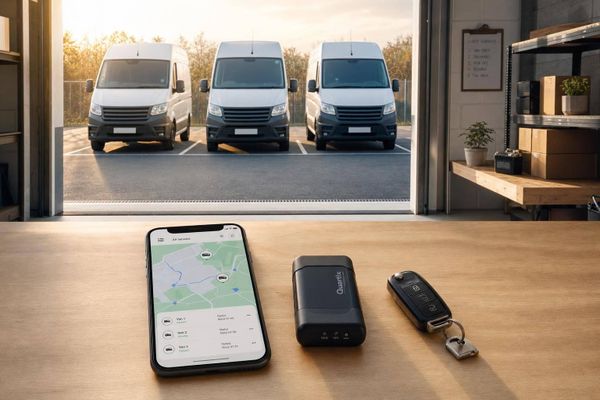
Choose hardwired, battery-backed or dual-tracker setups
The type of installation has a direct effect on day-to-day reliability and how well the van can still be tracked after tampering or theft.
Hardwired trackers pull power straight from the vehicle's electrical system. They're a solid fit for core fleet vans running regular routes.
Battery-backed units keep sending updates even if the vehicle battery is disconnected. That's handy for vans left parked for long stretches, or in cases where theft protection matters more.
Dual-tracker setups use both: a main hardwired device and a second hidden battery-backed unit. If someone finds and removes the main tracker, the hidden unit can keep transmitting. That gives you a better shot at recovery.
GRS Fleet Telematics offers hardwired, dual-tracker and immobilisation options from £7.99 per vehicle per month, so it makes sense to match the hardware to each van's risk level.
| Van type | Recommended setup | Rationale |
|---|---|---|
| Standard fleet van, regular routes | Hardwired (Essential, £35) | Reliable continuous power for daily tracking |
| High-value or tool-heavy van | Dual-tracker (Enhanced, £79) | Hidden backup unit improves recovery chances |
| High-risk asset or valuable cargo | Dual-tracker + immobilisation (Ultimate, £119) | Maximum theft deterrence with remote immobilisation |
| Short-term hire or subcontractor van | Battery-backed or portable unit | Easy to install and move without full electrical integration |
Once each van is configured, roll the system out in phases, and train dispatch, drivers and supervisors on how to use it day to day.
3. Roll out the system in phases and train staff to use the data
Fitting trackers across your whole fleet in one go can create risk you don't need. A phased rollout gives you room to test the setup with a small group, fix issues early, and then expand without guesswork.
Start with high-priority vans, routes or risk areas
Begin with the vans where tracking is most likely to make an immediate difference. In most fleets, that means the busiest multi-drop vans, vehicles carrying high-value tools or stock, and any vans parked overnight on-street or used in higher-theft areas.
A sensible place to start is the 20–30% of vans with the highest operational value or risk. Run that group for four to six weeks. Use the pilot to test update frequency, geofences and alert thresholds, and to get feedback from the people using the system every day. Once those core settings are working as they should, rolling out to lower-priority vans is far simpler.
Schedule installation to minimise downtime
A hardwired tracker usually takes around 30–45 minutes to fit, including wiring, securing the device and registering it on the platform. That doesn't sound like much. But across several vans in a busy week, it adds up fast.
Plan installations for evenings or weekends where possible, or pair them with planned maintenance so each vehicle loses only one period of availability.
After fitting, do a 10–15 minute test drive before putting the van back into service. Check that the live map position is correct, that updates arrive at the chosen interval, and that a geofence crossing triggers the right alerts. For hardwired and dual-tracker units, also check power reliability, tamper alerts and battery backup.
Once the hardware is live, the next job is making sure each team knows what to do with the data.
Train dispatchers, drivers and supervisors on daily use
Each group needs different training, so skip the one-size-fits-all session and keep it tied to the role.
| Role | Training focus | Key tools |
|---|---|---|
| Dispatchers | Nearest-vehicle allocation, live ETAs, rerouting | Live map, ETA view |
| Supervisors | Exception alerts, behaviour trends, weekly fuel and idle reports | Idle alerts, behaviour summaries |
| Drivers | Policy, privacy and benefits | Driver view, trip history |
Dispatchers should practise making allocation decisions from live positions instead of relying only on scheduled plans. That shift matters. A van may look right on paper but be stuck in traffic, delayed on-site, or already too far away to make the job on time.
Supervisors should look for patterns, not one-off incidents. A route with high idling week after week is often a process problem, not just a driver problem. Use behaviour reports and fuel summaries to support coaching, trend reviews and operational fixes, so coaching stays focused and compliant.
For drivers, present the system in terms of protection and fair treatment. Tracking can help speed up breakdown support, protect vans and tools from theft, and provide a clear record if there's ever a dispute about job completion time. Be clear about when tracking is active and when it is not. Giving drivers time to ask questions before the system goes live helps build trust and cuts resistance later.
Once the rollout is stable, use the live data to improve dispatch, maintenance and security.
4. Use live tracking data to improve dispatch, maintenance and security
Once rollout is live, turn the system into three day-to-day habits: dispatch using live position, review efficiency reports each week, and act on security alerts straight away. Those habits tie straight back to the four results this guide focuses on - faster dispatch, lower fuel spend, fewer delays and stronger security.
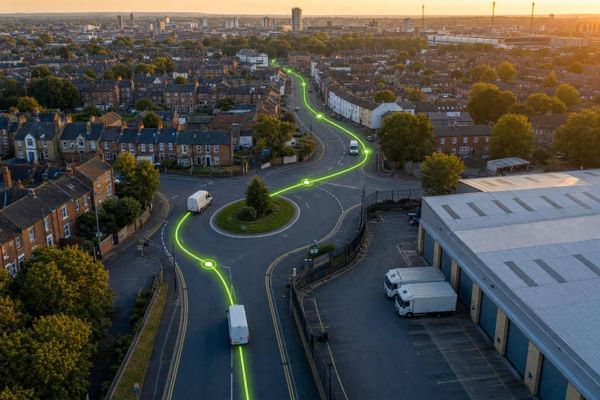
Use nearest-vehicle dispatch and live ETA updates
A lot of teams still default to calling the next driver on the rota. Live tracking gives you a smarter way to work. Check the map, find the closest suitable van with the right tools and capacity, and assign the job there and then. That cuts wasted mileage and gets someone to site sooner.
The same goes for ETAs. A planned arrival time can fall apart the moment a driver hits a delay. With live position, current traffic and known stops, you can update customers as soon as a live ETA changes in a meaningful way, instead of waiting for the phone to ring with a complaint.
Spot wasted time, unplanned detours and excess idling early
The patterns worth watching are repeated late arrivals, excess idling, unplanned detours and unexplained stops. A daily idle period of 20–30 minutes soon adds up to lost fuel and lost time. Check the weekly report to see which vehicles or routes keep showing up.
Use the journey replay feature to compare planned routes with what happened on the road. If you keep seeing detours or backtracking, that often points to a scheduling issue rather than a driver issue. Fix the schedule first. If the same pattern carries on, then coach the driver.
Support theft response and planned maintenance
When a depot or out-of-hours alert fires, have a named responder check the movement, contact the driver, and escalate if it can't be explained. Keep the vehicle registration, last known location and onboard inventory ready to hand so the responder can move fast.
The same data can help you time servicing and cut downtime. A van doing city multi-drop work - frequent braking, short runs, repeated stop-starts - will wear brakes and the clutch faster than one covering steady motorway miles. Use mileage and engine-hours to decide inspection timing, and book that work during quieter periods so it causes the least disruption to jobs.
Feed these readings into the monthly KPI review.
5. Review results every month and refine settings over time
Track the KPIs that show whether tracking is paying off
Once live tracking becomes part of day-to-day work, the monthly review is where the data starts to shape what you do next.
Treat the first three months after rollout as a tuning period. Start with the pre-rollout baseline you already logged: fuel spend, miles, idle time, jobs completed, on-time rate and security incidents. Then compare like with like each month, using the same definitions and the same data sources.
Keep the KPI list short. Focus on the numbers you'll act on: fuel spend per mile, average idle time per van per day, on-time arrival rate, route efficiency (actual versus planned miles), unauthorised use incidents and theft and security events. If a metric doesn't lead to a decision, cut it.
When a KPI slips, tie it to a clear change. That might mean tightening the idle alert threshold, redrawing a geofence, changing a route template or updating the driver policy. A monthly review only matters if it ends with a short list of actions and a named owner for each one. Otherwise, it's just another report.
Monthly KPI review table
Use this table as the agenda for each monthly operations meeting. Fill in the current month's figures, note the trend against last month, and agree on one or two actions for every red or yellow metric.
| KPI | What it measures | Data source | What improvement looks like |
|---|---|---|---|
| Fuel spend per mile (£/mile) | Average fuel cost relative to distance driven | Fuel card statements; tracker mileage reports | Falling £/mile over time without reducing job volume |
| Average idle time (minutes/van/day) | Engine-on, vehicle-stationary duration | Tracker idling reports | Fewer idle minutes per van each month |
| On-time arrival rate (%) | Punctuality against agreed job windows | Job management system; tracker arrival timestamps | Rising percentage of jobs within the agreed time window |
| Route efficiency (actual vs planned miles) | Degree of route drift and unnecessary detours | Route planning tool; tracker journey logs | Shrinking gap between planned and actual miles |
| Unauthorised use incidents (count) | Off-hours or out-of-geofence van movements | Tracker movement alerts and geofence logs | Fewer incidents per month |
| Theft and security events (count and recovery rate) | Exposure to theft and effectiveness of response | Security alerts; incident logs; insurer reports | Fewer incidents and a higher recovery rate when events occur |
Conclusion: Keep the setup practical, lawful and action-focused
The monthly review helps keep the system matched to the way the fleet works in practice. Check whether alert thresholds and geofences still fit current operations, and change them when they don't. Keep the process lean: one standard template, a fixed slot in the operations meeting, and three to five agreed actions per session.
That steady rhythm - review, act, refine, repeat - is what turns live tracking data into faster dispatch, lower fuel spend, less idling and stronger security. The system pays off when each monthly review leads to small, named changes that push those numbers the right way.
FAQs
How quickly should van tracking show results?
Real-time van tracking should give you immediate updates. Some devices refresh vehicle locations every 10 seconds, and alerts like geofence entry or exit can come through within five seconds.
That said, speed depends on the system. Older platforms may rely on batch uploads, which can delay updates by minutes or even hours. GRS Fleet Telematics provides continuous GPS tracking for immediate fleet visibility.
What should I do first if drivers are worried about privacy?
Start with a clear GPS tracking policy. It should spell out how vehicles are monitored, why the data is collected, and what steps are in place to protect drivers’ privacy.
Clear communication goes a long way here. When you show that your approach follows GDPR and the Human Rights Act 1998, it can help build trust with drivers instead of making tracking feel like a black box.
It also helps to give staff some control where appropriate. For example, you can use privacy buttons or settings that switch tracking off outside working hours.
Which vans should I track first in a small fleet?
Prioritise vans based on value, theft risk in the areas where they operate, and what your day-to-day work demands. Start with high-value vehicles and any vans that regularly work in theft-prone urban areas.
If route optimisation is the main goal, begin with vans used for standard daily operations. Assess each vehicle’s risk level so your tracking investment lines up with your fleet’s needs.